


Architectural Cable Rail Systems
Attachment | Rail Set Up | Choose a Cable | Assembly | Frame Work | Part Catalog


Dowmet, LLC is proud to offer Cable Rail Systems. Read below to learn how the cable rail attaches, how to setup the Cable Rail, Cable Rail End Attachment Specifications, How to Choose a Cable Rail, Cable Rail Assemblies, and Basic Cable Rail Framework. Visit our Cable Rail Parts Catalog to view Cable Rail Parts, and fully customize your Dowmet, LLC Cable Rail System.
How the Cable Attaches to the Cable Rail System

Machine Swage (swaj): Fittings are attached to the cable by means of a cold forming press. The completed fitting has a smooth uniform appearance and will develop full cable strength. Swaging services can be performed by professional riggers and sling manufacturers.

Hand Crimp: Hand Crimp is available in 1/8” & 3/16” cable only. Fittings are attached to the cable using a simple hand tool (allows field installation). The completed fitting will provide approximately 65-70% of the 7×7 cable strength. We can provide the necessary tool.

Mechanical: Fittings are available for all cable sizes and are attached with simple hand tools. Mechanical fittings are more expensive than other means of attachment but develop full cable strength.
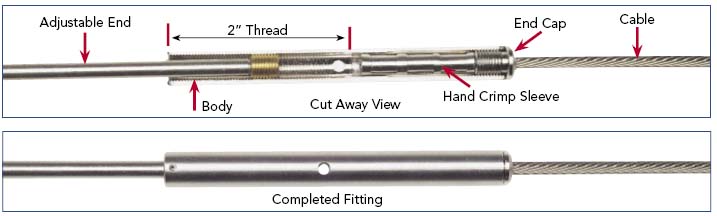
Smooth Line Turnbuckle-Cable Attachment Smooth Lines have no exposed threads and the cable is fastened internally by a sleeve on the back side of the cap.
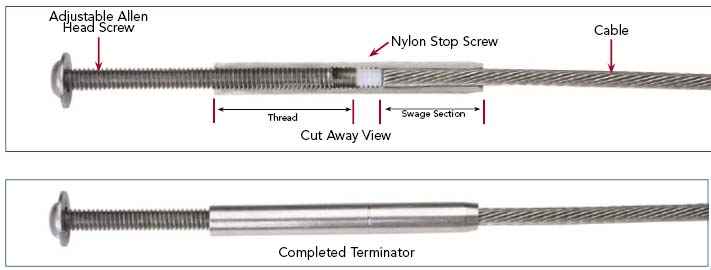
Terminator Turnbuckle – Cable Attachment
The Terminator uses coarse thread for use with the supplied screw or with a coarse screw of your choice.
How to Set Up The Cable for The Cable Rail System:
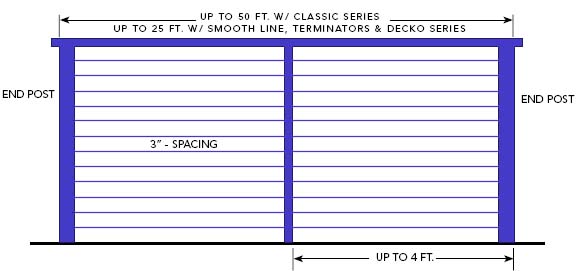
- Space cable at 3 inches on center to meet a 4 inch code or 1 inch closer than the code requires.
- End posts need to be strong enough to support the number of cable assemblies used and tensioned to 350 lbs. per cable assembly.
- Intermediate posts need to be placed every 4 feet.
- Cable lengths need to be kept under 50 feet in length for conventional turnbuckles and up to 25 feet for Smooth Line and Terminator fittings.
Cable Rail End Attachment Specifications:

Choose a Cable for your Cable Rail System:
Generally 1/8”, 3/16”, or 1/4”, 1×19 stainless steel cable is chosen for most railing applications. Cable can be readily obtained coated in hard PVC or uncoated. 3/16” cable is the most popular size for residential and 1/4” cables for commercial railings.
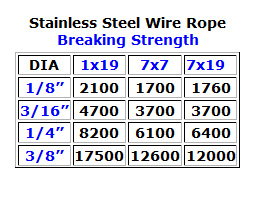
Description of Cable Rail Wire Construction:
Generally 1/8”, 3/16”, or 1/4”, 1×19 stainless steel cable is chosen for most railing applications. Cable can be readily obtained coated in hard PVC or uncoated. 3/16” cable is the most popular size for residential and 1/4” cables for commercial railings.
1 x 19 – Semi-rigid…used for straight runs
7 x 7 – Semi-flexible…used for short runs and decorative corners
7 x 19 – Flexible…used for decorative purposes
Cable Rail Assemblies
Aesthetics are very important so we provide a variety of fittings that do the same thing but have a different appearance. You can design your rail and mix & match to come up with just the look you want. Dowmet, LLC does not make cable assemblies, but we can set you up with a cable fabricator in your area to provide for your needs. For Hand Crimp fittings, wire and the proper tool to make your own cable assemblies, call Dowmet, LLC.
Basic Cable Rail Frame Work
The following is only a guide line. Please check your local building code for use of cable rails.
Cable Rail Framework:
End posts and corners need to be made from the following minimums:
- Round Pipe 1-1/2” ID Schedule 80
- Square Tube 2” X 2” X 1/4” Wall
- Angle Iron 2” X 2” X 1/2”
- Flat Bar 2” X 1”
- Wood Post 6” X 6